To Set Display Settings of ToDo
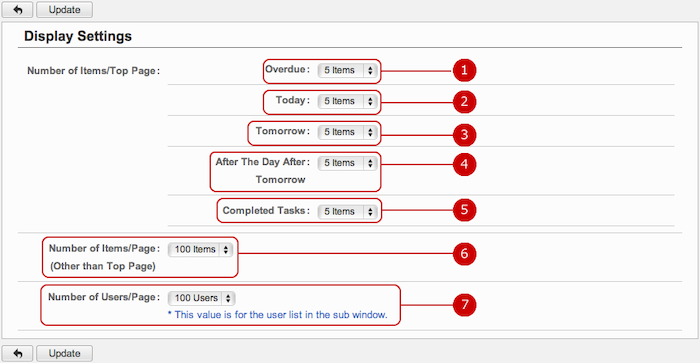
Click "Display Settings" of Settings Menu and go to Display Settings screen.
-
Select how many overdue tasks to display on Top Page screen.
Options are 1 item, 2 items, 3 items, 4 items, 5 items, 10 items, 15 items, and 20 items.
-
Select how many due-today tasks to display on Top Page screen.
Options are 1 item, 2 items, 3 items, 4 items, 5 items, 10 items, 15 items, and 20 items.
-
Select how many due-tomorrow tasks to display on Top Page screen.
Options are 1 item, 2 items, 3 items, 4 items, 5 items, 10 items, 15 items, and 20 items.
-
Select how many due-after-the-day-after-tomorrow tasks to display on Top Page screen.
Options are 1 item, 2 items, 3 items, 4 items, 5 items, 10 items, 15 items, and 20 items.
-
Select how many completed tasks to display on Top Page screen.
Options are 1 item, 2 items, 3 items, 4 items, 5 items, 10 items, 15 items, and 20 items.
-
Select how many tasks to display on screens excluding Top Page.
-
Select how many other users' names to display in the option area of Side Pane.
When the setup is complete, press "Update" button to save the data.
To Set Reminder
Click "Reminder Settings" of Settings Menu and go to Reminder Settings screen.
You can dictate what time to get task reminders.
* This menu item does not appear when:
- An administrator set "Email Notification" to "Do Not Use" in Mail Server Settings.
- An administrator set "Reminder" to "Do Not Use" in desknet's NEO Menu Settings.

-
Select what time to get reminders.
When the setup is complete, press "Update" button to save the data.
To Setup Access Rights
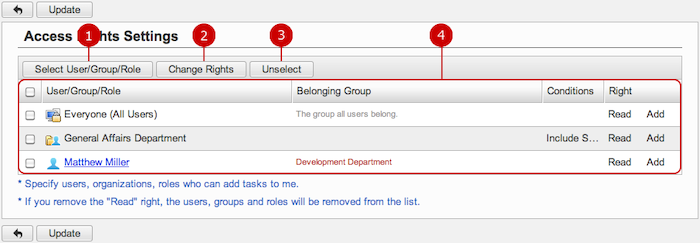
Click "Access Rights Settings" of Settings Menu and go to Access Rights Settings screen.
You can dictate who, what groups or roles are able to read and add tasks for you.
* This feature is not available when the administrator set "User Right Setting" to "Disallow" on Setup > Basic Settings > User Right Setting screen.
-
Select User/Group/Role opens Select window to choose any of users, groups, and roles which you would like to set the access rights of.
(Please refer to the explanation of the user/group/role selection in the user's manual for more details.)
-
Change Rights opens Change Rights window to set the access rights on selected users, groups, and roles in the list below.
-
Unselect removes selected users, groups, and roles in the list below.
-
This is the list of users, groups, and roles you specify the access rights. It consists of User/Group/Role, Belonging Group, Conditions, and Right.
A user's row would show its Belonging Group. A group's row shows a Condition, "Include Subordinates," when the group contains its sub groups.
When the setup is complete, press "Update" button to save the data.
- To Change Access Rights
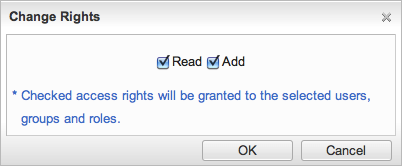
There are two access rights: "Read" and "Add".
-
Right to Read
It is the right to read a task of you.
-
Right to Add
It is the right to record a task on you.
* You cannot apply the right to add without that to read. If you remove the right to read on a user, group, or role, it will be automatically removed from the list of Access Rights Setting.
Click "OK" button to complete the settings.
To Manage Labels
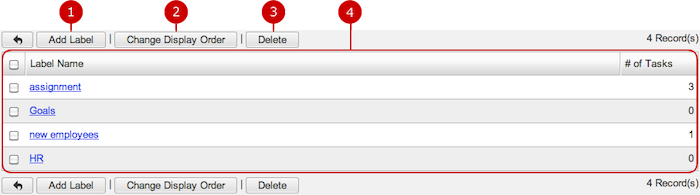
Click "Label Settings" of Settings Menu and go to Label Settings screen.
You can add, edit, and delete labels.
To Create a Label
Click "Add Label" and go to Add Label screen.

When all done, click "Add" and save the data.
To Edit a Label
Click the link of a label to go to Edit Label screen.

When the setup is complete, press "Update" button to save the data.
To Delete a Label
When you press "Delete" button on Recipient Whitelist Settings screen or Update Recipient screen, a confirmation window appears.
The label will be deleted right after clicking "Yes". The labels will be permanently deleted and cannot be recovered. Please take note.
Copyright (C) 2012-2016 NEOJAPAN Inc. All Rights Reserved.
