To Edit Profile
When you press the link of Profile in Settings menu, Edit Profile screen is displayed.
Enter your login information, workplace and personal information.
The information you entered can be viewed by User Directory application.
* You may not change some fields if your administrator make them non editable.
 General Information
-
Enter a name.
-
Enter a nickname.
-
Enter a login ID.
* You have to enter this information when the login option is set to "By Entering User ID and Password".
-
Enter a login password.
* If you do not set a password, the user does not have to enter a password when login.
* Users cannot input a password that does not meet password policy if it is set by an administrator. Input any password that meets the requirement.
-
Enter the same password you entered again to confirm the password.
-
Choose an image file.
* If you want to delete a file, check "Delete" and press "Update" button.
The image is used in Neotwi, Discussion, posts of Project Management, Profile screen is displayed.
-
Enter an email address.
Enter an email address each of "Workplace", "Mobile", "Home", "Other".
* Notification Email will be sent to checked Email addresses.
* Choose the Private if you do not want other users to see the Email address.
-
Set the default group.
Choose a group which is initially used to display lists in each application.
Workplace Information
-
Enter a division.
-
Enter a department.
-
Enter a department (2).
-
Enter a job title and its code.
The job title code is used to sort the data by the code.
-
Enter telephone Nos.
Enter a telephone No., each of department, another department, extension, mobile.
-
Enter a Fax number.
Personal Information
-
Choose a gender.
-
Enter a birthday.
-
Enter a ZIP/Postal code.
-
Enter an address.
-
Enter a home and mobile telephone number.
Season Ticket InformationThis section appears when the Transportation/Expense features are enabled by the system administrator.
(For more information, please refer to the user's manual's Transportation/Expense.)
When the entry is complete, press "Add" button to save the data.
To Display List of Private Groups
When you press the link of Private Group Settings in Settings menu, Private Group Settings screen is displayed.
Private groups you created can be shared by each application.
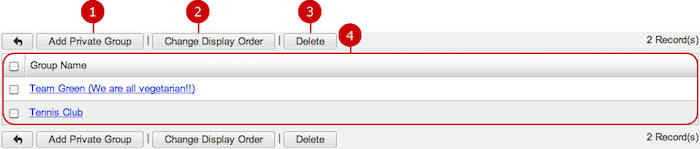
To Add Private Group
When you press "Add Private Group" button, Add Private Group screen is displayed.
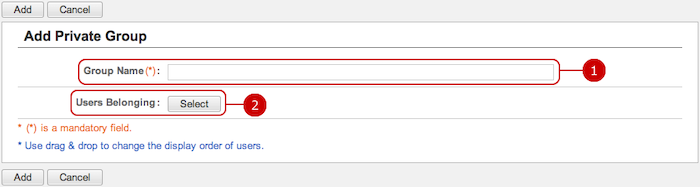
-
Enter a name of the group.
-
Select users.
When you press "Select" button, the selection of user/group/role window is displayed.
(Please refer to the explanation of the user/group/role selection in the user's manual for more details.)
When the entry is complete, press "Add" button to save the data.
To Edit Private Group
When you press a link of Group Name, Edit Private Group screen is displayed.
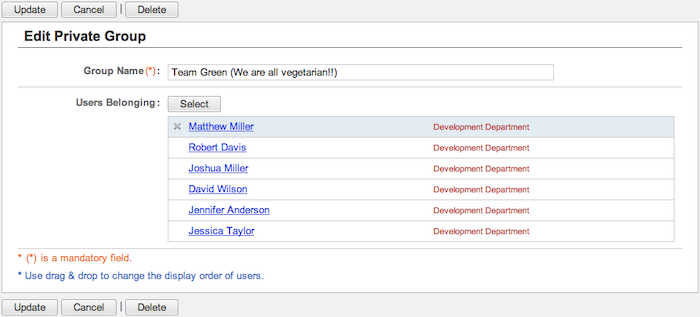
When changes are complete, press "Update" button to save the data.
To Delete Private Groups
When you press "Delete" button on Recipient Whitelist Settings screen or Update Recipient screen, a confirmation window appears.
When you press "Yes" in the delete confirmation windows, the private group is deleted. The deleted groups cannot be recovered. Please take note.
To Set Screen Size Settings
When you press the link of Screen Size Settings in Settings menu, Screen Size Settings screen is displayed.
You can change the screen size to match the size of your monitor.
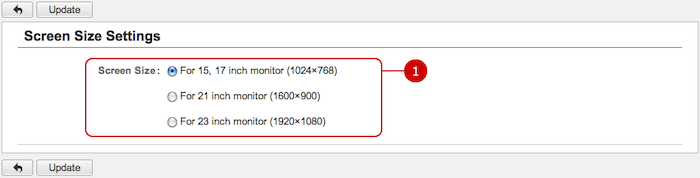
-
Choose a size.
The screen is switched to the size you selected.
When the setup is complete, press "Update" button to save the data.
To Set Design Settings
When you press the link of Design Settings in Settings menu, Design Settings screen is displayed.
* You may not change some fields if your administrator make them non editable.
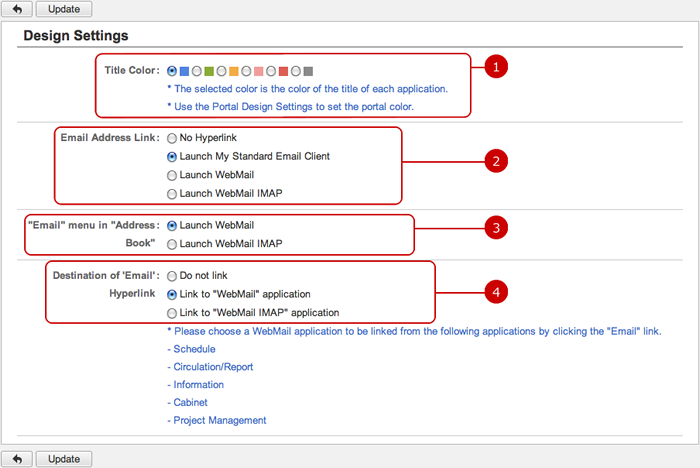
-
Choose a color for the title.
The color you selected is the basic color of the title of each screen.
* Use the Portal Design Settings to set the portal color.
-
Choose where email addresses on screen link to.
If "No Hyperlink" is selected, email addresses doesn't convert into links.
If "Launch My Standard EMail Client" is selected, clicking a link of the email address opens the user's default email client.
If "Launch WebMail" is selected, clicking a link of the email address opens the message composing screen of the WebMail application.
If "Launch WebMail IMAP" is selected, clicking a link of the email address opens the message composing screen of WebMail IMAP application.
* If "Launch WebMail IMAP" is selected even though WebMail IMAP application is not enabled, the result is the same as "No Hyperlink".
Links to Email addresses appears on the following screens.
- Each user's profile dialog
- Lists of User Directory application
- Mailto links created by the rich text editor
- Email addresses in other applications
-
Choose which the "Email" link on the Address Book window links to.
Select whether to use "WebMail" or "WebMail IMAP" in Address Book application.
If "WebMail IMAP" is selected even though WebMail IMAP application is not enabled, the result is the same as "WebMail".
-
Select a destination of "Email" link.
The destination of "Email" link will be used in the following functions:
- Schedule
- Circulation/Report
- Information
- Cabinet
- Project Management
If you choose "Do not link", "Email" link will not be displayed in each function.
If "Link to "WebMail" application" is selected, message composing screen of WebMail will be displayed when you click an "Email" link.
If "Link to "WebMail IMAP" application" is selected, message composing screen of WebMail IMAP will be displayed when you click an "Email" link.
* You cannot change a destination of "Email" link if administrator settings is set to not allow changes.
* "Launch WebMail" selection will not be displayed if WebMail function has been disable in administrator settings.
* "Launch WebMail IMAP" selection will not be displayed if WebMail IMAP function has been disable in administrator settings.
* "Launch WebMail" and "Launch WebMail IMAP" selections will not be displayed if WebMail and WebMail IMAP function has been disable in administrator settings.
When the setup is complete, press "Update" button to save the data.
To Set Basic Menu Settings
When you press the link of Menu Settings > Basic Menu Settings in Settings menu, Basic Menu Settings screen is displayed.
You may not change some fields if your administrator make them non editable.
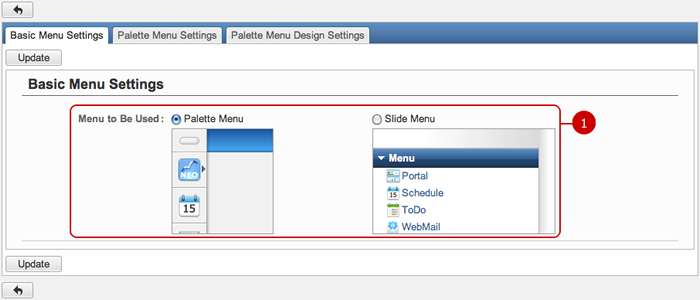
When the setup is complete, press "Update" button to save the data.
To Set Palette Menu Settings
When you press the link of Menu Settings > Palette Menu Settings in Settings menu, Palette Menu Settings screen is displayed.
You may not change some fields if your administrator make them non editable.
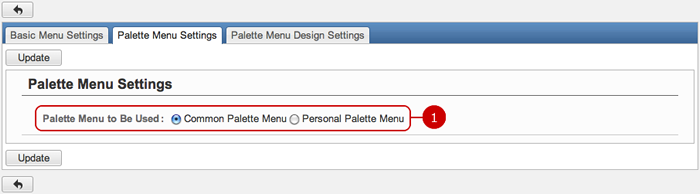
When the setup is complete, press "Update" button to save the data.
To Set Personal Palette Menu Settings
When you press the link of Menu Settings > Personal Palette Menu Settings in Settings menu, Personal Palette Menu Settings screen is displayed.
You can create the personal palette menu by selection and moving menu items to the area on the left.
* This guide describes based on desknet's NEO menu setting screen.
* You may not change some fields if your administrator make them non editable.
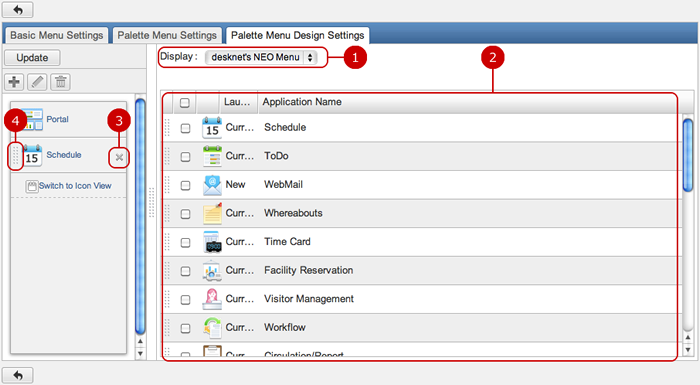
When the setup is complete, press "Update" button to save the data.
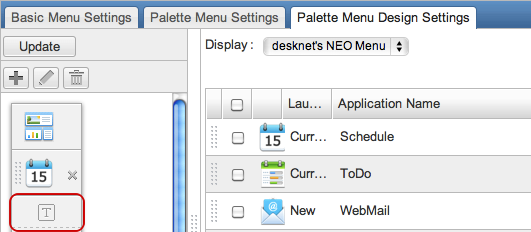
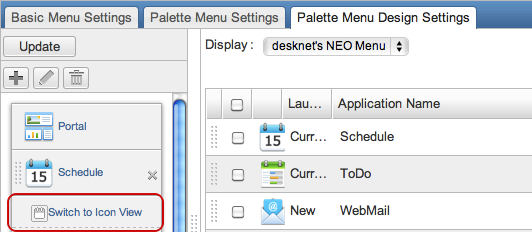
- Switch Palette Menu View
When you press "T" button, the palette menu is switched to display text and icons.
When you press "Switch to Icon View", the palette menu is switched to display icons.
To Manage Menu Groups
You can add, edit and delete menu groups to group menu items.
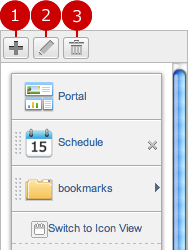
-
Add a new group.
When you press "Add Menu Group", a new window for the creation of group is displayed.
Enter a name of the group and choose an icon.
-
Edit a menu group name.
When you choose a group you want to change the name and press "Edit Menu Group" button, Edit Menu Group screen is displayed.
Enter a name of the menu group and save it.
-
Delete a menu group.
When you choose a menu group you want to delete and press "Delete Menu Group" button, the menu group is deleted.
* Press and hold down the mouse button over the data you want to move and move the mouse and release the mouse button on desired place to change the display order.
- To Move to Menu Group
When you are moving a menu item, if you release the mouse button over a menu group, the menu item is moved to the menu group.
* If you choose a menu item from the list and release the mouse button over a menu group, the menu item is moved in the menu group.
When the setup is complete, press "Update" button to save the data.
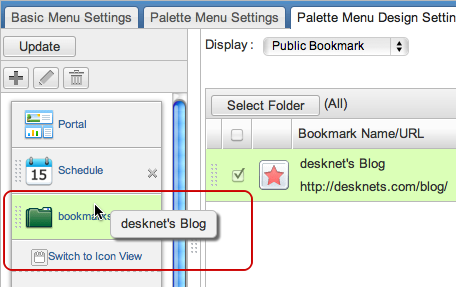
To Edit Menu Items in Menu Group
When you press a menu group, menu items in the menu group are displayed.
-
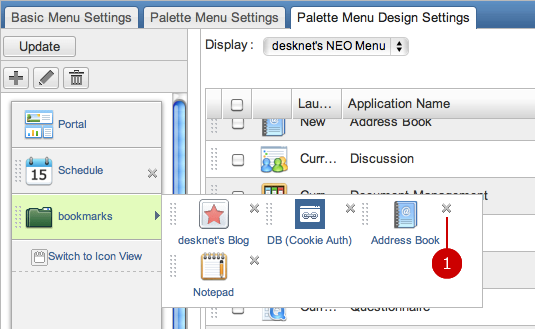
Delete a menu item from the group.
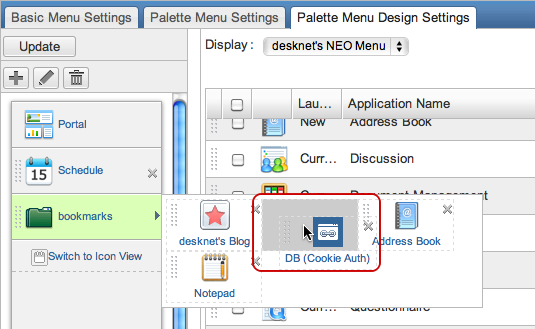
- To Change Display Order of Menu Items
Hold down the mouse button over the grip on the left side of a menu item and release the mouse button over desired place to change the display order.
When the setup is complete, press "Update" button to save the data.
To Set Language and Time Zone Settings
When you press the link of Language and Time Zone Settings in Settings menu, Language and Time Zone Settings screen is displayed.
You can choose a language and time zone.
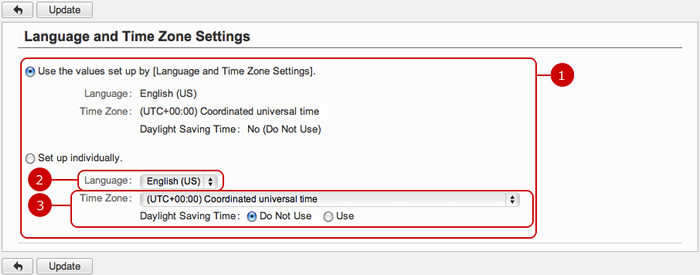
-
You can choose language and time zone setting from the following.
- Use the values set up by "Language and Time Zone Settings".
- Setup individually.
If you choose "Set up individually", choose a language, time zone and daylight saving time.
-
Choose a language.
The screens for the user will be displayed in the language you selected.
* You will receive email announcements in English if you did not select Japanese.
-
Choose a time zone and daylight saving time.
Please change daylight saving time option manually.
* Every email announcement shows dates depending on your setting of time zone.
* The sender's time zone is displayed on the top of email announcements if the sender's time zone differs from the recipient's one because the email message may have recipients all over the world.
For example, this message will be added to the top of a message: (The date and time described in the following content are represented in UTC+09:00 AM.)
When the entry is complete, press "Add" button to save the data.
Copyright (C) 2012-2016 NEOJAPAN Inc. All Rights Reserved.
