To Setup Private Portal Design Settings
When you press the link of Private Portal Design Settings in Settings menu, Private Portal Design Settings screen is displayed.
You can setup Private Portal Design Settings.
* If use of the private portal is not allowed, you cannot use the portal design settings.

-
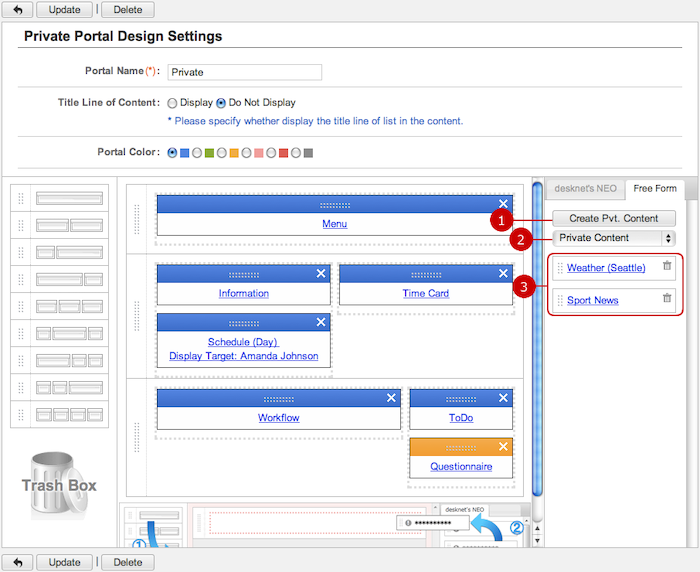
Enter a private portal name.
The name is displayed on the tab of the private portal.
-
Choose whether to display title line of content.
-
Choose a color of the portal.
The tab color of the private portal is changed.
-
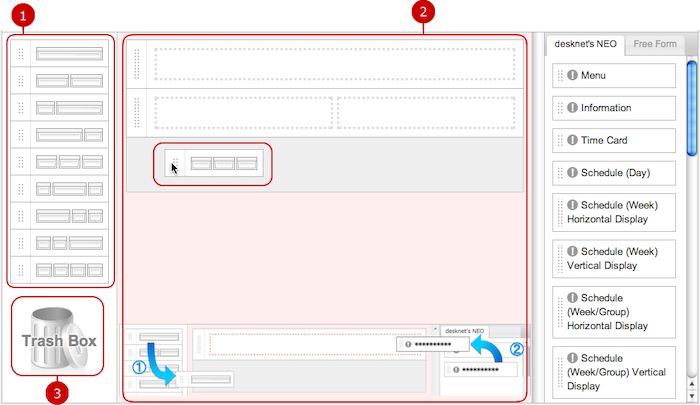
Design the layout of contents.
press a layout and hold down the mouse button, and then move it to desired place and release the button to place the layout.
-
Delete layout.
Press and hold down the mouse button over the grip on the left side of a layout you want to remove, and then move it to Trash and release the mouse button.
-
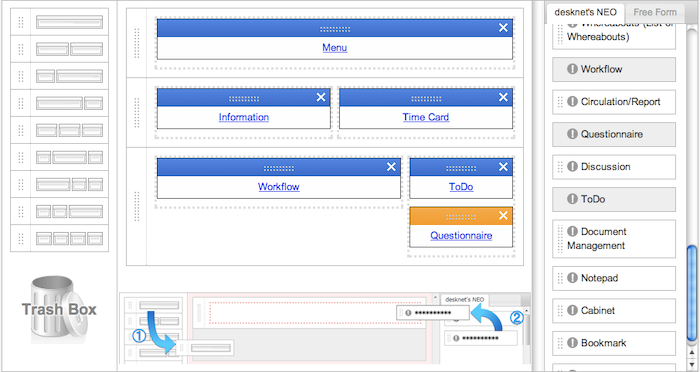
This is space for design the portal.
Choose layouts from the left side of the screen and place them, and choose content from the right side of the screen and place it on a layout.
-
Choose a desknet's NEO's content to be displayed on the portal.
Choose a content and place it on a layout.
(Please refer to To Setup desknet's NEO Content for more details.)
-
Choose a free form content to be displayed on the portal.
Choose a content and place it on a layout.
(Please refer to To Setup Free Forms for more details.)
When the setup is complete, press "Update" button to save the data.
To Setup Layouts
Select layouts from the layout design list on the left of the screen and place them the portal design setting space in the center of the screen.
-
Choose a layout.
Choose any one of 9 layouts.
Press a layout and hold down the mouse button, and then move it to desired place and release the button to place the layout.
-
Display the layout you placed.
You can put content inside of dotted border line.
Hold down the mouse button over the grip on the left side of layout and move up and down.Release the mouse button to change the display order of the layout.
-
Delete layout.
Press and hold down the mouse button over the grip on the left side of a layout you want to remove, and then move it to Trash and release the mouse button.
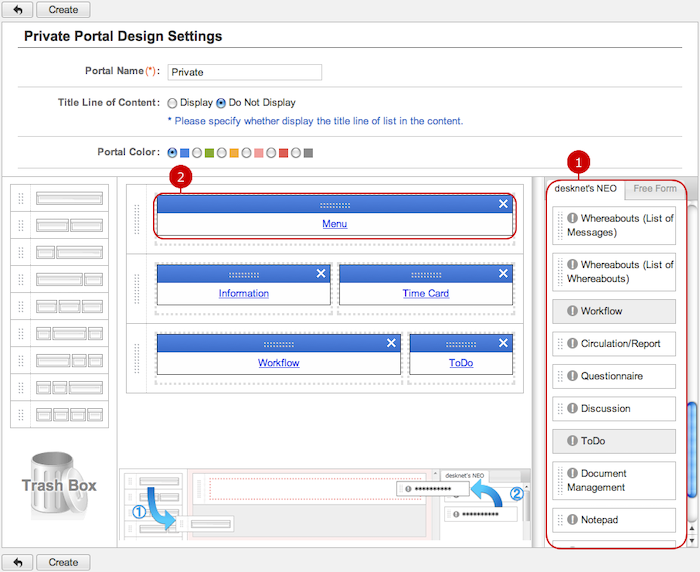
To Setup desknet's NEO Content
Place desknet's NEO content to be displayed on the portal on a layout.
-
The list of desknet's NEO contents is displayed.
When you press "!" symbol, you see the description of the content in balloon.
Hold down the mouse button over the grip on the left side of a content and move the mouse to over a layout. When you release the mouse button, the content is placed on the layout.
* Once content has been placed on a layout, its background color is changed and you cannot place the content.
* If the system administrator has disabled a certain application, its content does not appear in the list. (The WebMail and WebMail IMAP contents are not displayed if you do not have an appropriate email account.)
-
Edit a portal content.
When you press the link of application name, Edit Portal Content screen is displayed.
You can set the color of content and other settings.
- Configurable items (excluding contents' colors) by each application.
* Menu
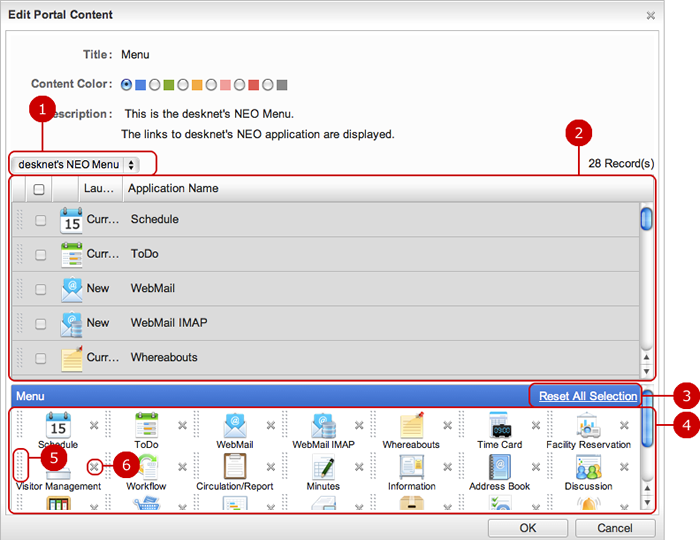
* Information

-
Define the maximum height of the content.
-
The categories of Information.
Click a category, and it will appear in the right Display Category.
-
Selected categories which was clicked in the left Category list.
These categories will be displayed in the Information content in Portal screen.
- Sort categories of Information content
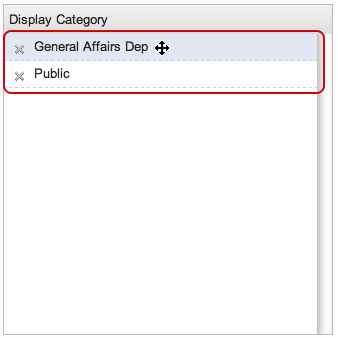
Hold down the mouse button on a category, move it, and release the mouse button, and the category is moved to anywhere in the list.
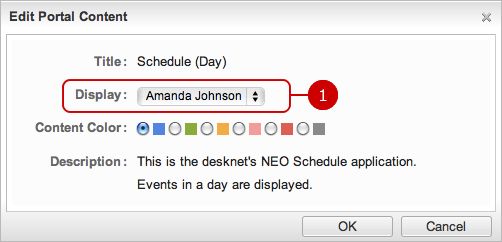
* Schedule (User)
-
Select a target user of schedule.
You can select one from yourself or other ones.
* Schedule (Group)

-
Select a target group of schedule.
You can select one from Default Group or other ones.
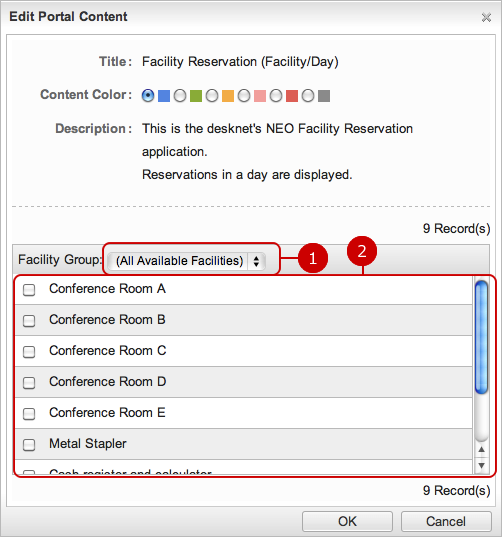
* Facility Reservation
-
Change the facility groups.
-
The list of facilities.
Check the check boxes of facilities to be displayed in the Facility Reservation content in Portal screen.
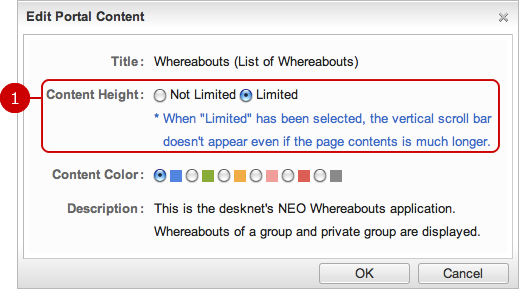
* Whereabouts
-
Define the maximum height of the content.
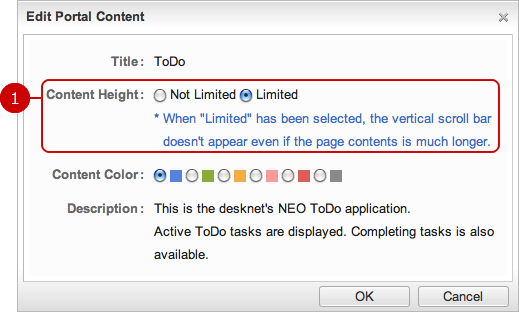
* ToDo
-
Define the maximum height of the content.
* Bookmark
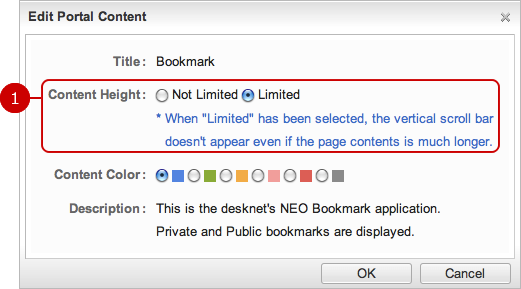
-
Define the maximum height of the content.
Click [OK] on the setting window after confirming the settings.
- Contents can be arranged in multiple lines in a layout.
To Setup Free Forms
You can use gadgets and blog parts with useful features or web pages other than desknet's NEO as content.
* If Use Private Content is set to "Disallow" in "Application Management" - "Portal Settings", you cannot create free forms.
You can use free forms that have been created by administrators and portal application administrators. (You cannot edit and delete these contents)
-
Create a private free form content.
If your portal application administrator set Use Private Content to "Disallow", this button is not displayed.
-
Switch content to be displayed in the list.
Switch between private and common content to be displayed in the free form content list.
-
The list of contents is displayed.
Contents of the type selected by content switching are displayed.
Setting method is the same as desknet's NEO content.
Trash icon is displayed for contents created by you.
When you press Trash icon, the content is deleted.
To Create Private Content
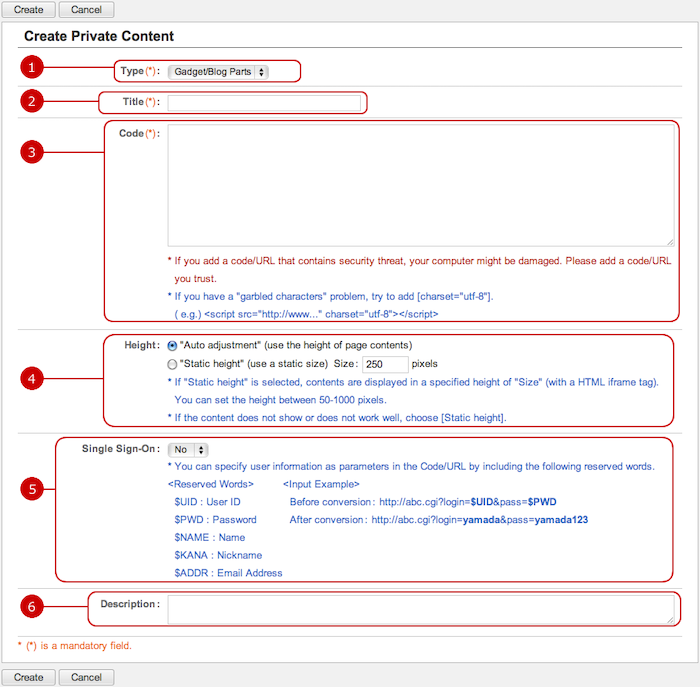
When you press "Create Private Content" button on Portal Design Settings screen, "Create Private Content" screen is displayed.
You can choose one of 3 types of contents, "Gadget/Blog Parts", "URL" and "Rich Text".
* If Use Private Content is set to "Disallow" in "Application Management" - "Portal Settings", you cannot create free forms.
- Creating gadgets/blog parts content
- Creating URL content
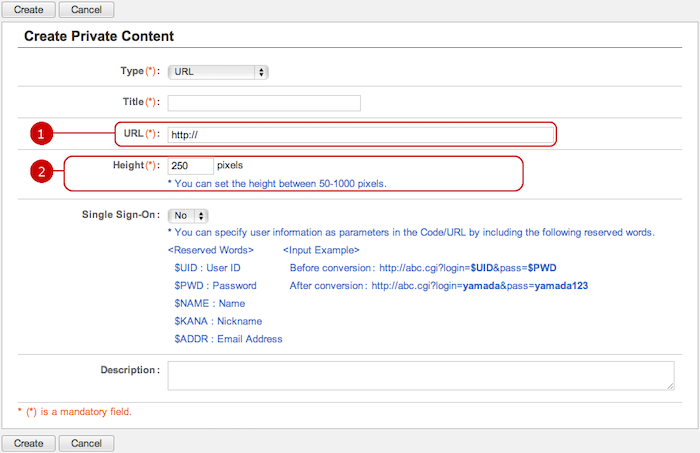
-
Enter a URL of a web page.
-
Enter a height.
Setting of Title, Single Sign-On, Description is similar to creating gadget/blog parts content.
- Creating rich text content

-
A window to insert the image in the editor is displayed.
(Please refer to the explanation of image selection in user's manual.)
-
Enter what you want to display as the content.
You can use text decoration and images freely.
(Please refer to the explanation of the rich text editor for more details about the rich text editor.)
Setting of Title, Descriptions similar to creating gadget/blog parts content.
When the entry is complete, press "Add" button to save the data.
To Display Private Bookmarks
When you press the link of Private Bookmark Settings in Settings menu, Private Bookmark Settings screen is displayed.
You can add, edit and delete private bookmarks.
You can use bookmarks you created Create are available for bookmark of the portal content.
-
Create a bookmark.
-
Change the display order of bookmarks you selected.
Choose bookmarks on the list and then press "Change Display Order" button to switch the screen mode to Change Display Order mode.
In Change Display Order mode, choose the destination of the bookmarks. You can choose more than one bookmark at once.
* Press and hold down the mouse button over the data you want to move and move the mouse and release the mouse button on desired place to change the display order.
-
Delete the selected bookmarks.
Select bookmarks you want to delete and press this button to delete them. You can select more than one bookmark.
-
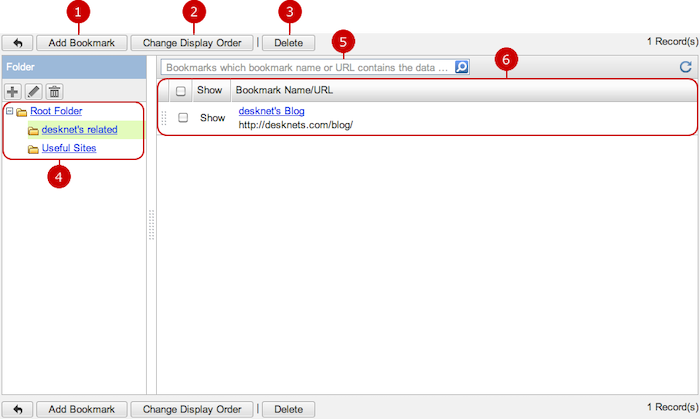
Container to store bookmarks in each category called folder.
When you press the link of each folder, bookmarks stored in the folder are displayed.
You can add, edit and delete folders here. (Please refer to managing folder for more details)
-
You can find bookmarks by the keyword search function.
"Bookmark Name" and "URL" of bookmarks in the folder are searched.
* If you want to specify more than one keyword, use space to separate keywords.
-
The list of bookmarks is displayed.
When you press a link of the bookmark name, the edit bookmark screen is displayed.
To Add Bookmark
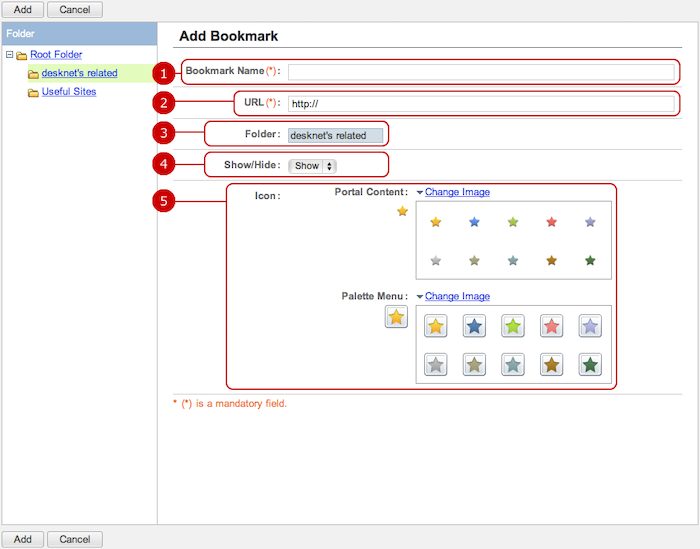
When you press "Add Bookmark" button, Add Bookmark screen is displayed.
-
Enter a bookmark name.
-
Enter a URL of the bookmark.
-
Choose a folder to save the bookmark.
Choose the folder where you want to save the bookmark from the folder list on the left.
-
Choose Show or Hide.
If you choose "Hide", the bookmark is not displayed.
-
Choose icons for the bookmark.
You can set icon to be displayed in the portal content and icon to be displayed in the palette menu.
Icon can be selected from predefined icons.
When you press "Change Image" link and choose "Upload Image" from the menu, the uploading screen is displayed.
You can press "Browse" button to choose an image file to upload.
* If you upload an image file, the size of the image file is reduced to 14 x 14 pixels (width x height) for the portal content, and 30 x 30 pixels (width x height) for the palette menu.
* You can add a file smaller than or equal to 1024 byte.
When the entry is complete, press "Add" button to save the data.
To Edit Bookmark
When you press a link of the Bookmark Name, Edit Bookmark screen is displayed.
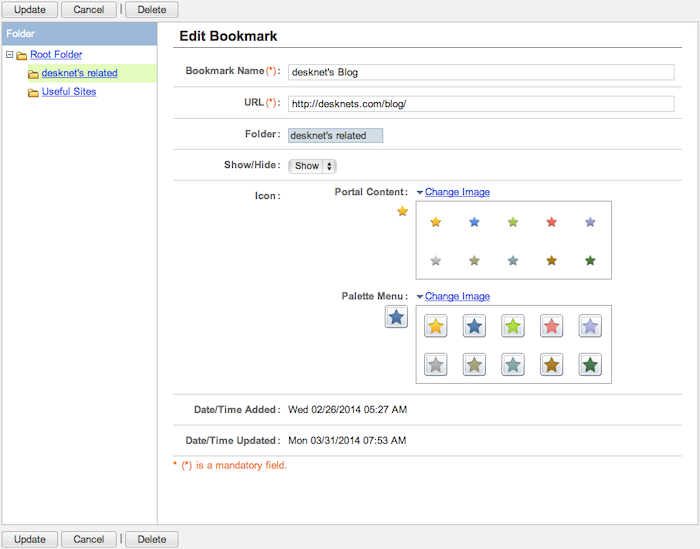
You can change any information of the bookmark.
When changes are complete, press "Update" button to save the data.
To Delete Bookmark
When you press "Delete" button on the list of bookmarks or Edit Bookmark screen, a confirmation window is displayed.
When you press "Yes" button, the bookmarks are deleted. The deleted bookmarks cannot be recovered. Please take note.
To Manage Folders
You can add, edit and delete folders in the list of folders.
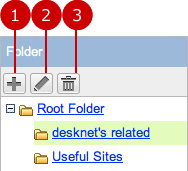
* Press and hold down the mouse button over a folder and move the mouse up and down and release the mouse button on desired place.
To Search Bookmarks
When you open the menu on the left side of screen, the bookmark search function appears.
You can find bookmarks by entering the conditions, such as keyword, data update.
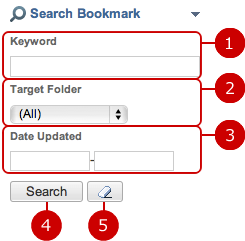
-
Enter keywords.
The search function searches in "Bookmark Name" and "URL" by the keywords.
* If you want to specify more than one keyword, use space to separate keywords.
-
Choose a folder to be searched.
You can choose either "All" or "Selected Folder". The search function searches in the target folder.
-
Specify the period of update date.
When you click an entry field, a calendar will be displayed. Click a date on the calendar, and it will be set to the field.
* Enter a date in MM/dd/yyyy format, numeric.
-
When you press "Search" button, bookmarks that match the search criteria are displayed in the list screen.
-
When you press [
 ] button, all search conditions are cleared.
Copyright (C) 2012-2016 NEOJAPAN Inc. All Rights Reserved.
